Written By: Andrew Price
Last Updated: June 26, 2024

In this article we will show you step-by-step on how to Signup, Install, Setup/Configure, and Use one of the best password managers around, 1Password. We will give you detailed instructions and screenshots along the way to help with the process. 1Password will help you store and generate secure passwords, 2FA (Two-factor Authentication) Codes, and Passkeys. This will help you in keeping your passwords organized and more secure. We have compiled a list of the Best Password Managers of 2024 here to make your choice easier.
This guide by WhatismyIP will offer details and step-by-step instructions on how to set up 1Password, a leading password manager, to protect your privacy and security while you’re online. Everything from account setup to features, price, compatibility, and installation is covered. With the advantages of a secure password management solution, we can improve your security and eliminate the headache of managing passwords for you, your family, and your business.
The significance of utilizing a password manager and the process for setting up one of the better ones on the market (1Password) will be covered in detail in this article. Starting with signing up for an account, either personal, family, or business we will talk about what each has and compare the plans together. Installing it on all your devices, we’ll guide you through all the different devices you can use it on and where to find the files you will need to download. By the end of this, you will know how to get and use 1Password password manager to protect your accounts and why they are so important to your online privacy and security. Together, we can improve your security and eliminate the headache of managing passwords for you, your family, and your business.
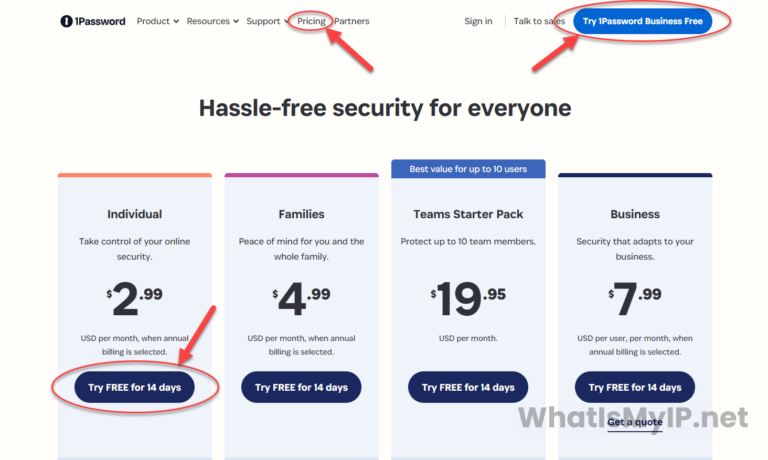
1. Go to the 1Password Website: Open your web browser and navigate to the 1Password website.
2. Get Pricing: Click on the “Try 1Password for Free” or “Pricing” button at the top to see the available plans and choose the one that suits your needs. In this tutorial we will be signing up for the Individual Plan. All the plans come with a 14 day Free Trial.
3. Choose your plan: Click on the “Try Free for 14 Days” button under your chosen plan and follow the prompts to create your account. You’ll need to provide your email address and create a strong master password.
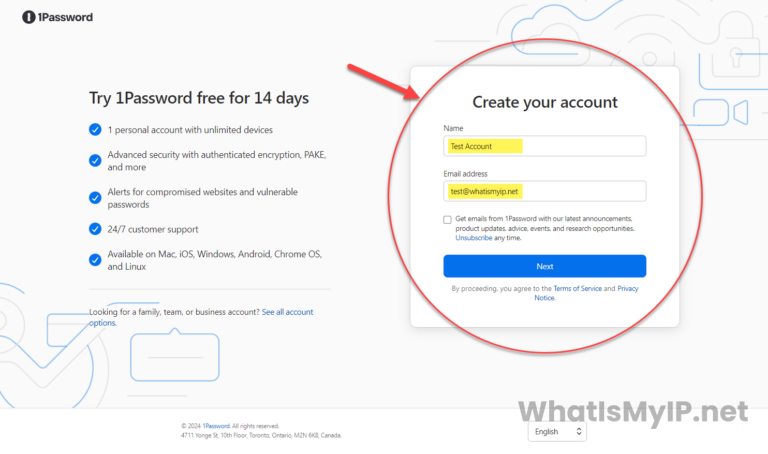
4. Create your account: On this screen you will need to enter your full name and a email address that will be associated with the main account holder. This email address will get verified in the next step so make sure you have access to it. You can opt-in or opt-out of receiving product updates from 1Password by checking the box or leaving it unchecked. Then click next to go to the next step to verify your email address.
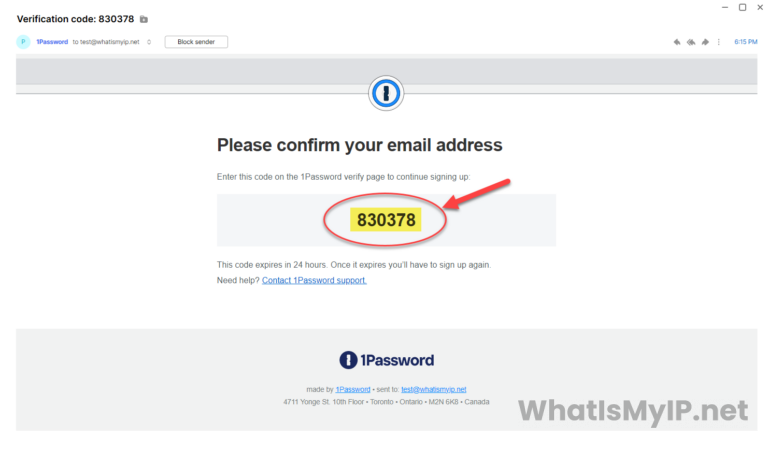
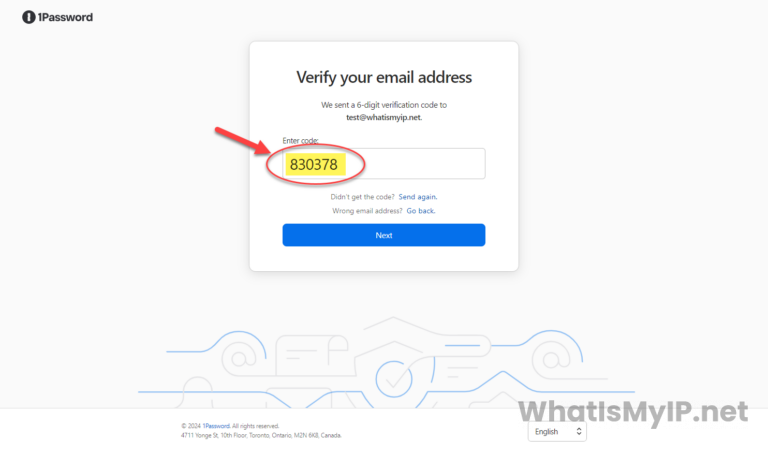
5. Verify your email address: Here you will be asked to enter a 6 digit code you will receive on the email address you provided on the last step. Enter the 6 digit code and click next. If you didn’t receive the code, give it at least a few minutes, and also check you spam folder. You can click on the link to “Send again” if it has been over 5 minutes and still no email, or if your email address was incorrect, click the “Go back” link to enter a new email address.
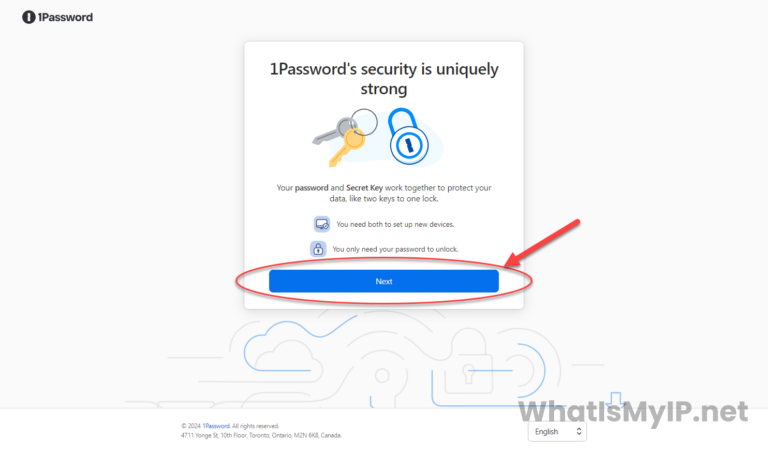
6. Information about the security: Here you will see a box telling you about your password and Secret Key you will need to setup any new device. Just click “Next” to go to the next step.
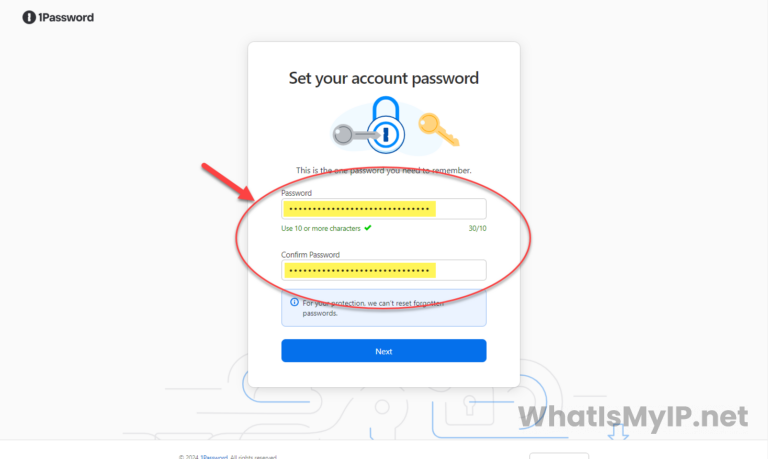
7. Set your account password: On this screen you will need to set your account’s main master password. It needs to be at least 10 characters or more with a mix of lower case and upper case letters, numbers, and special characters as well. This will be your main password so we suggest you setup something that you can remember and long enough to it can’t be brute forced. In our options, have something like 20-30 characters long. Click “Next” when done.
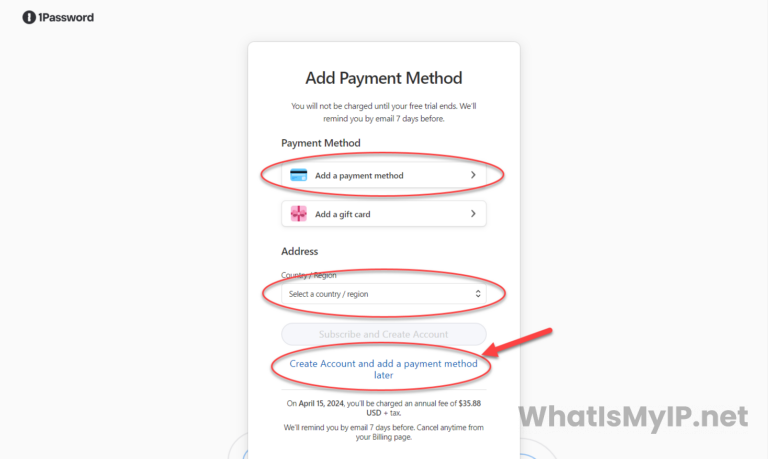
8. Add Payment Method: On this screen you will be asked to setup a payment method. You can either setup a Credit Card for your billing by clicking the “Add a payment method” button, or add a gift card if you have by clicking the “Add a gift card” button. Once you go through the steps to add your payment method, you will then need to add your billing address on this screen by inputting your Country first, then it will ask you for the rest of your address. If you do not wish to add a payment method just yet, you can click on the “Create Account and add a payment method later” link which will setup your account and you can add a payment method before your trial ends.
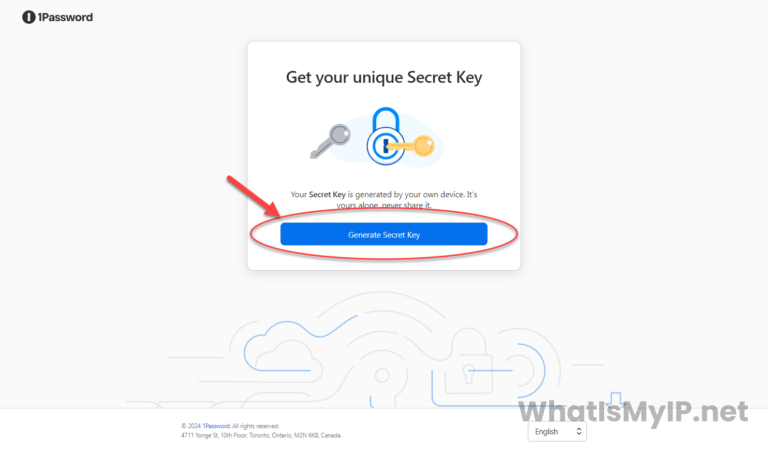
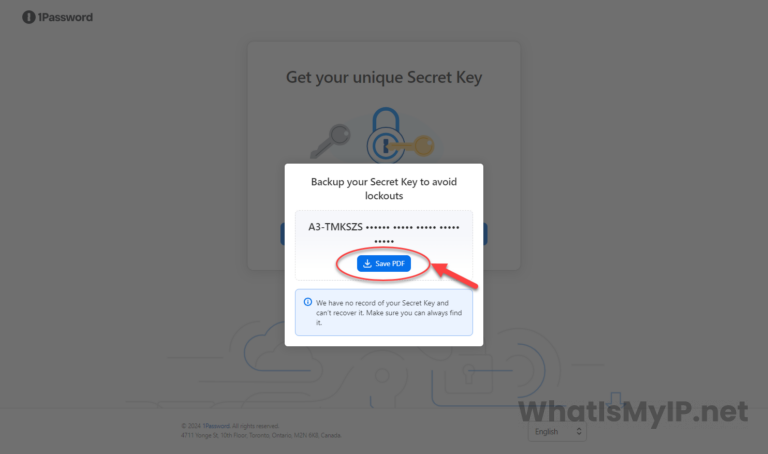
9. Get your unique Secret Key: Here you will be prompted to generate your secret key which you will use to login to your account on your devices for the first time. Just click the “Generate Secret Key” and away you go.
10. Backup your Secret Key: Once you click to generate your secret key, you will get a popup box asking to your save your Secret Key as a PDF file. Click the “Save PDF” and save this file in a secured location.
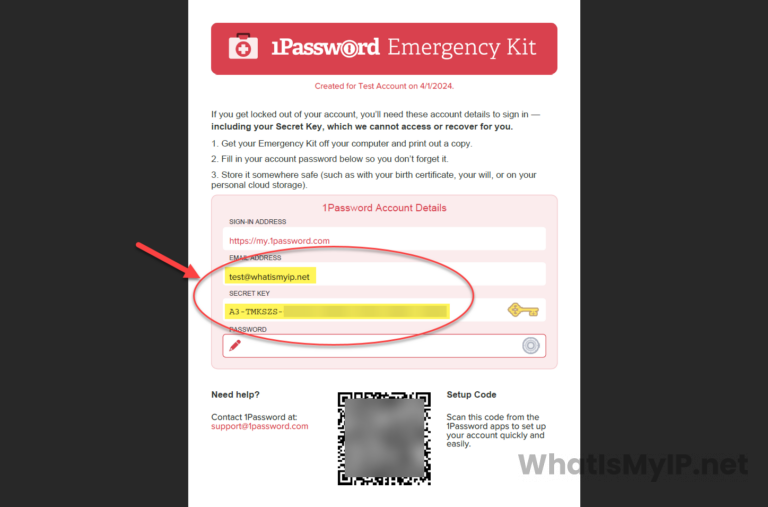
10.1 Secret PDF File: This is that your saved Secret Key PDF file will look like. It’s also called your “1Password Emergency Kit” which will have all the info for you to login to your 1Password account from a new device. You can also print it out and write in your master password in the provided space and store a hard copy in a safe place. You will even have a qrcode at the bottom to scan and quickly setup the new device with the required website address.
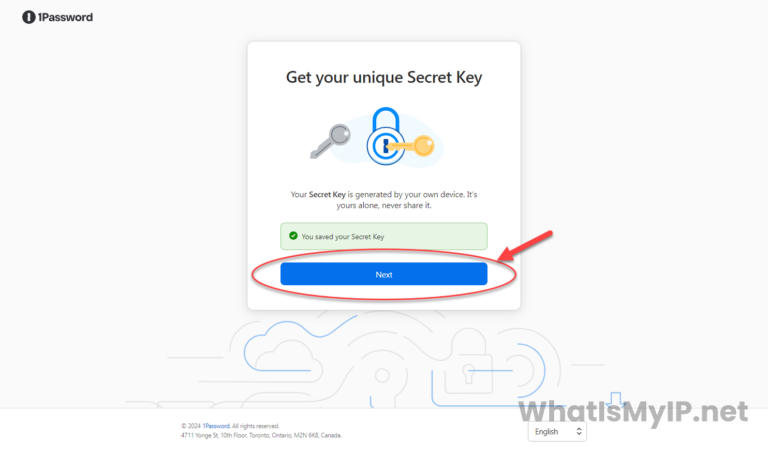
11. Secret Key Saved: Once your Secret Key file has been save, you will see a green confirmation and the button for continuing. Click the “Next” button to move along.
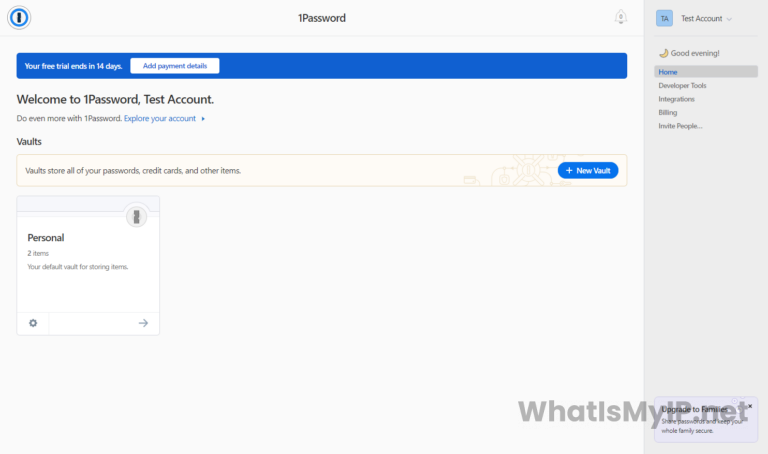
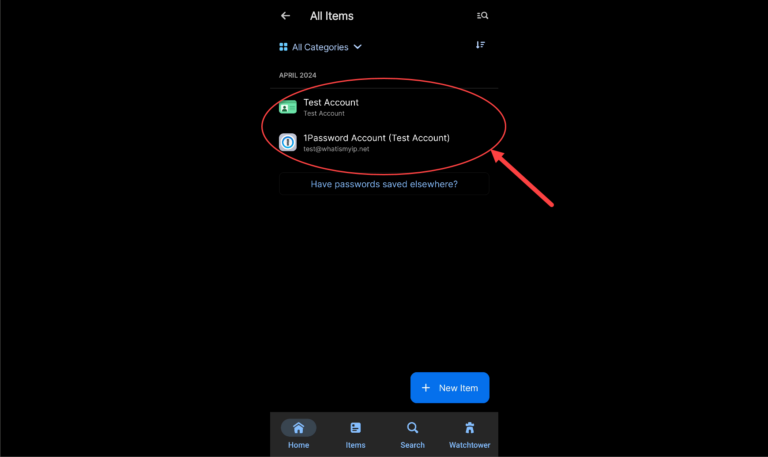
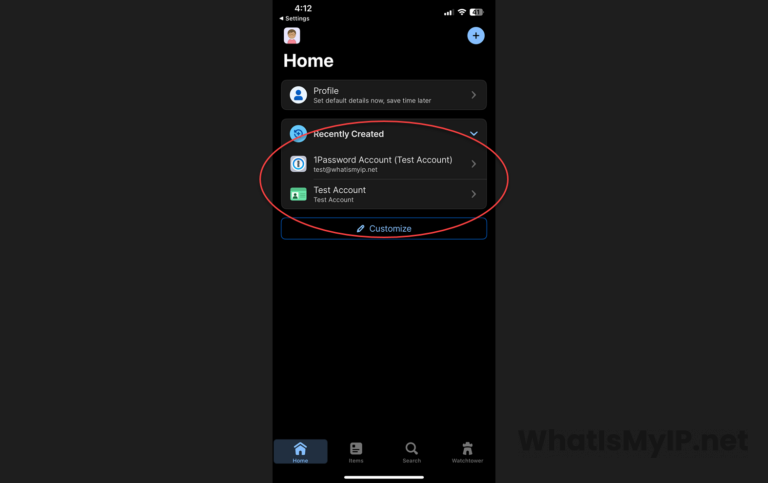
12. Signup Complete: Once you click next on the previous screen, you will be automatically logged into your account and you will be able to start add and importing your passwords.
Next we will be walking you through the steps on Installing and using 1Password on different type of devices as in Windows, MacOS, Android, iOS, and Browser Extensions for Chrome, Firefox, Microsoft Edge, and Safari.
We will also go deep into how to correctly configure 1Pasword for all your devices and how to use 1Password as your default password manager for everyday use. Once everything is setup, it’s pretty simple and straight forward on how to use it and make your life a little easier and safer online.
We will walk through the steps for downloading and installing 1Password for you different devices. Most of them are about the same, but they have their own configuration you can do for each.
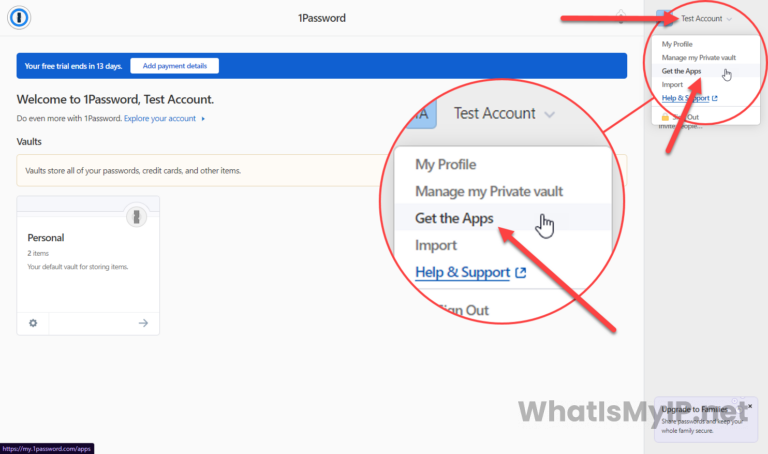
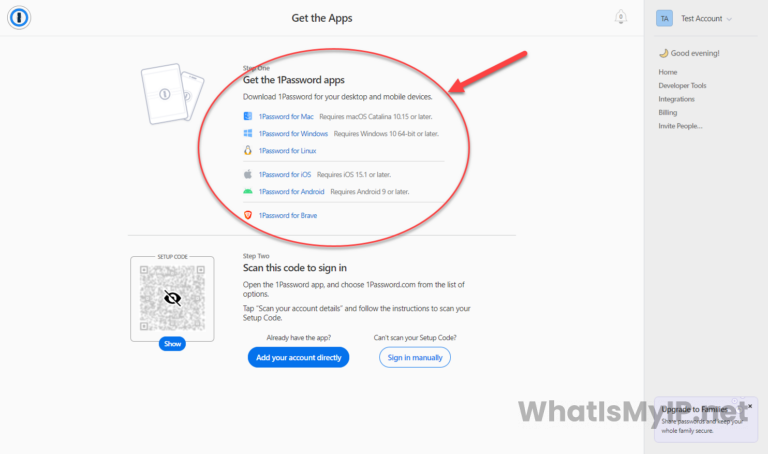
After signing up, you’ll need to go and download the 1Password app for your device. At the top right hand corner you will see your name and a pulldown menu, click your name and on the menu click on “Get the Apps”. 1Password offers apps for Windows, MacOS, Linux, iOS, Android, and Browser Extensions. You will need to visit the downloads page once you are logged in and select your device’s operating system to download the appropriate app.
Once the download is complete, follow the installation instructions for your device. This usually involves opening the downloaded file and following the on-screen prompts. Below we will give you a step-by-step on how to install and setup for the different devices.
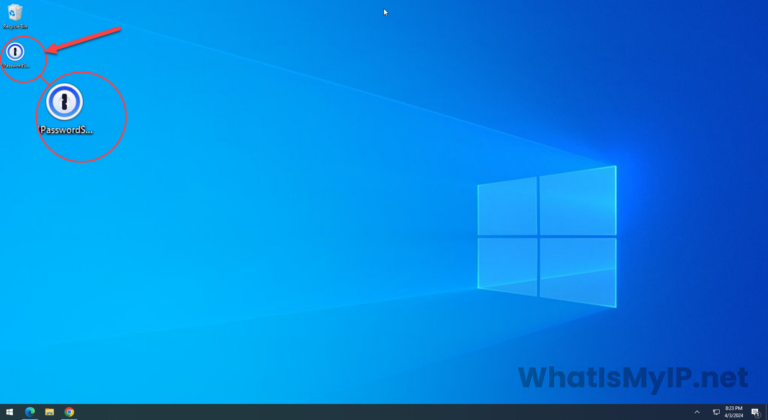
1. Download the Windows App: Visit the 1Password downloads page and select the “1Password for Windows” link. Click the link to get the installer.
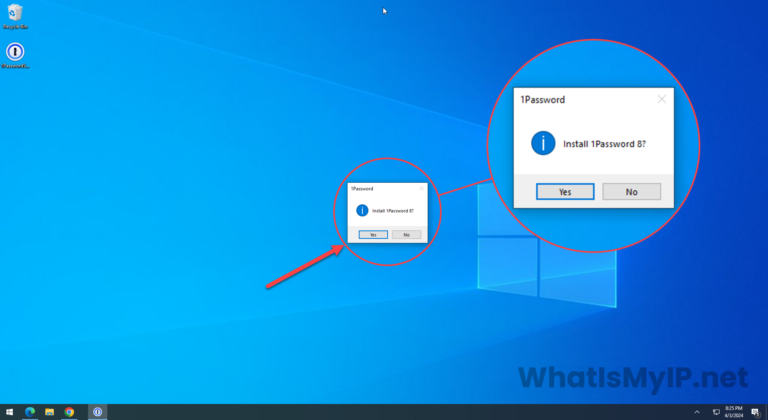
2. Install the App: Once the download is complete, open the location you saved the installer file to and double-click on it to start the installer. Once the installed starts, you will be asked if you want to install 1Password, just click “Yes” to continue with the installation.
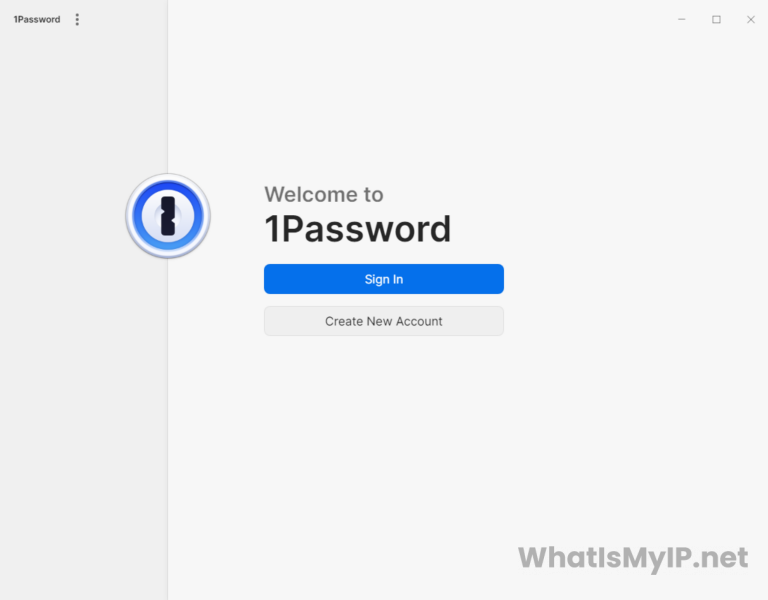
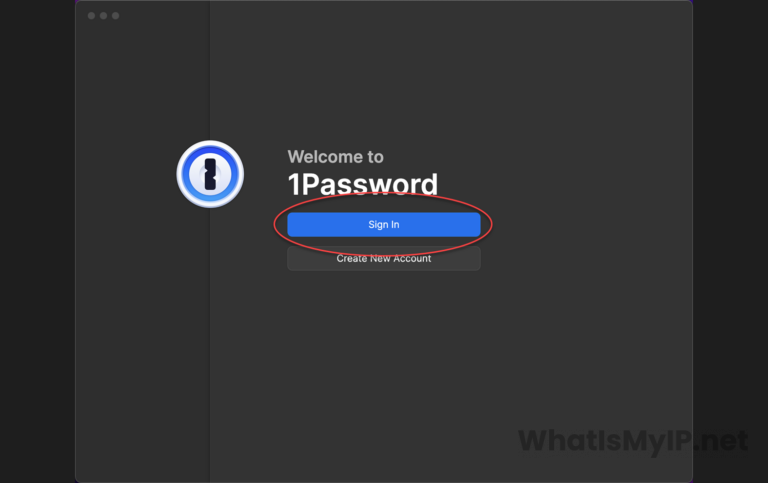
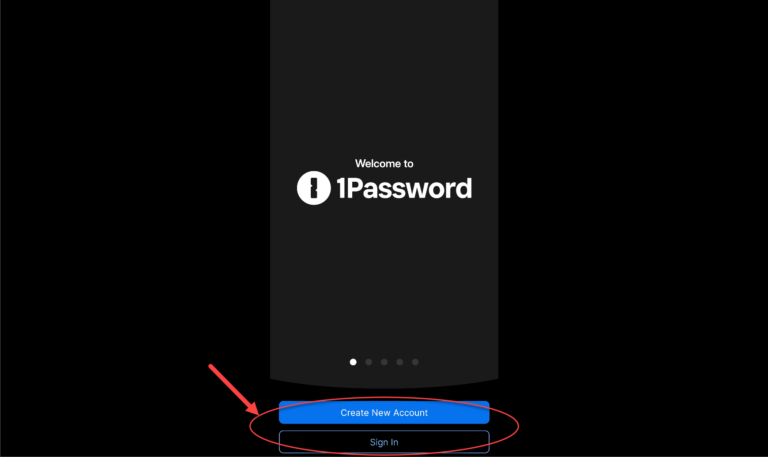
3. Installation Complete: Once the installation is complete a box will pop up saying “Welcome to 1Password” and will give you the option of Signing In or Creating a New Account. We will be signing in so click the “Sign In” button to continue setting up the software.
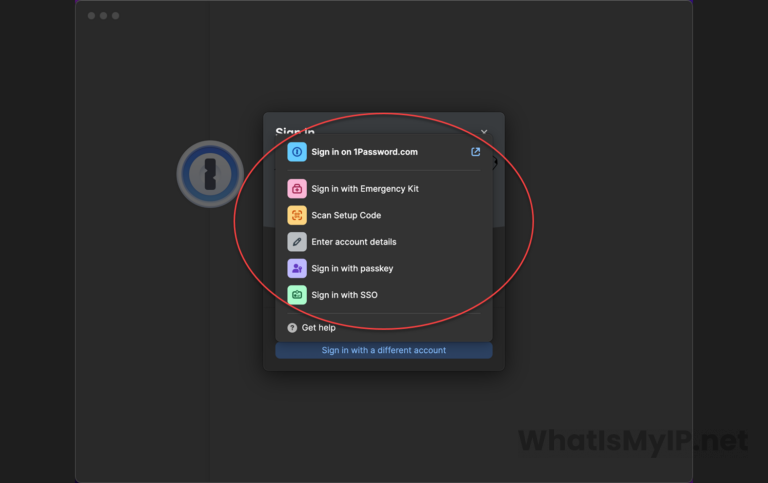
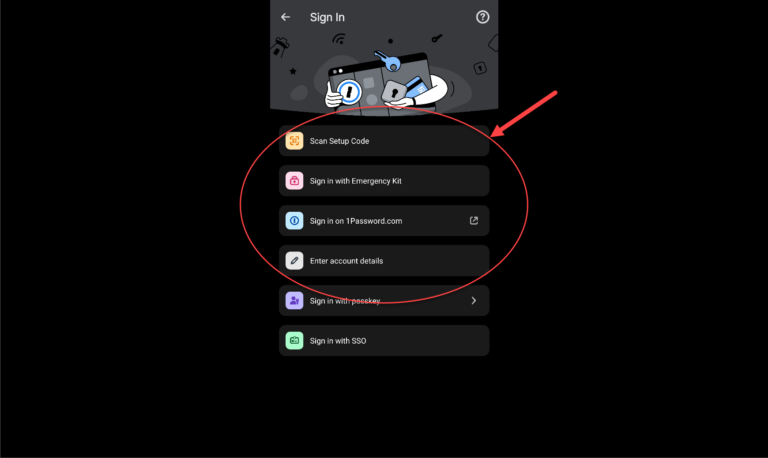
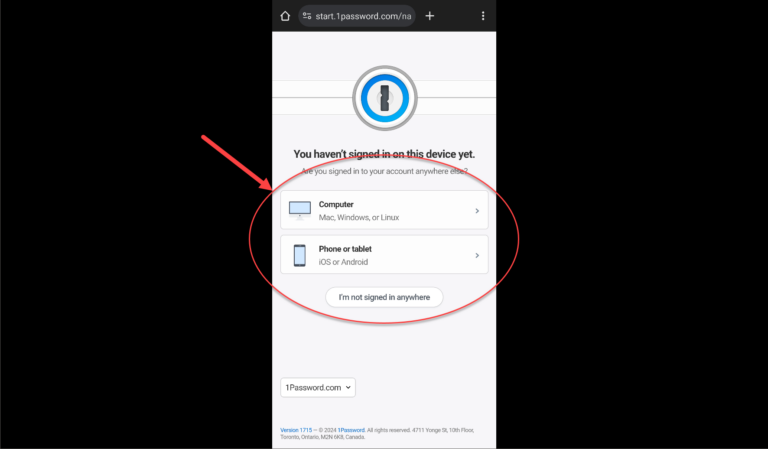
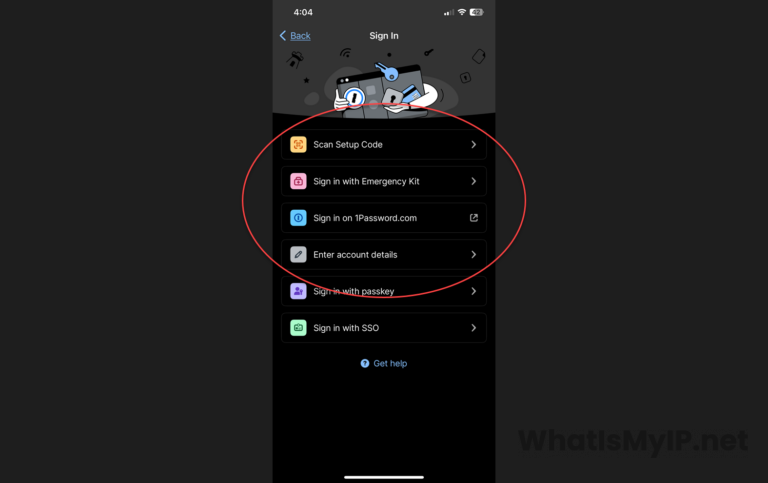
4. Singing In: At this step you will be prompted with the sign in options. We have a few choices here we will talk about 3 of the choices to use. You can really choose which ever one works for you.
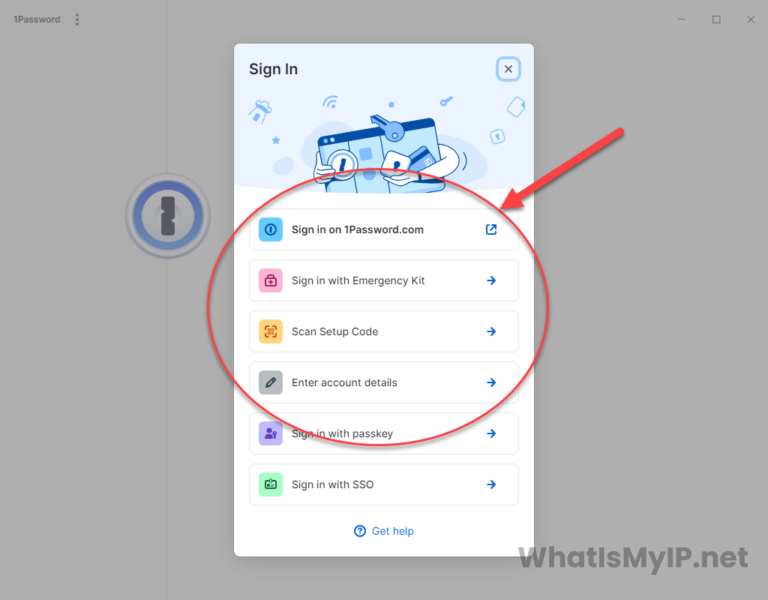
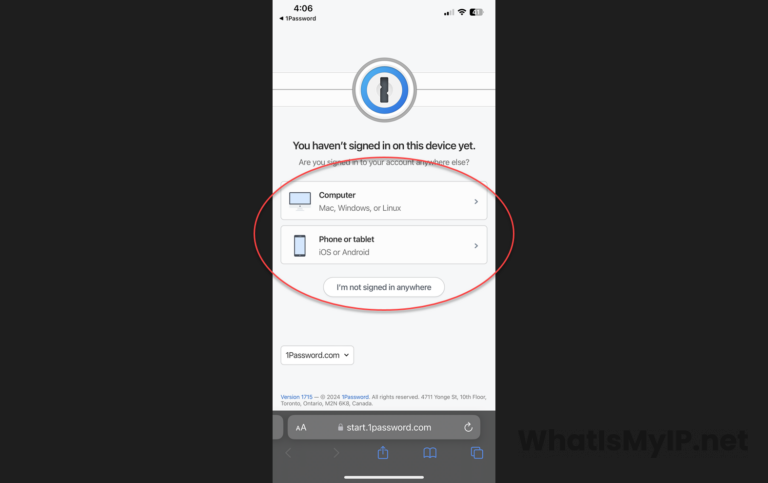
4.1. Sign in on 1Password.com: The first choice is probably the easiest as you are most likely logged in to the website and your account area. Click the “Sign in on 1Password.com” button and your browser will go to the login page of 1Password with some of your login credentials already prefilled.
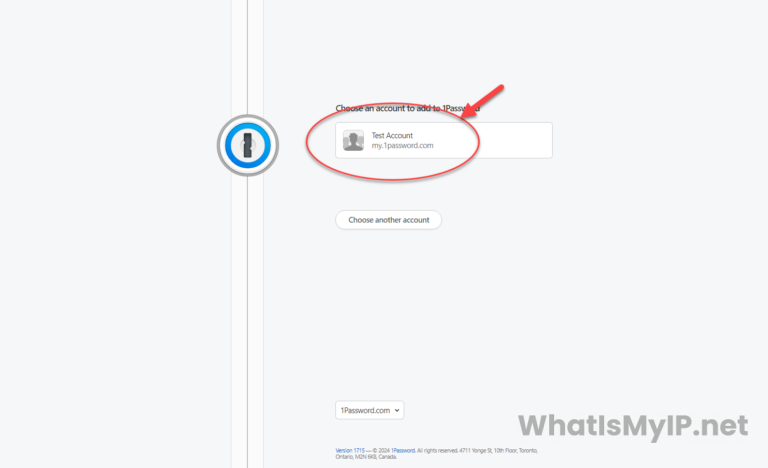
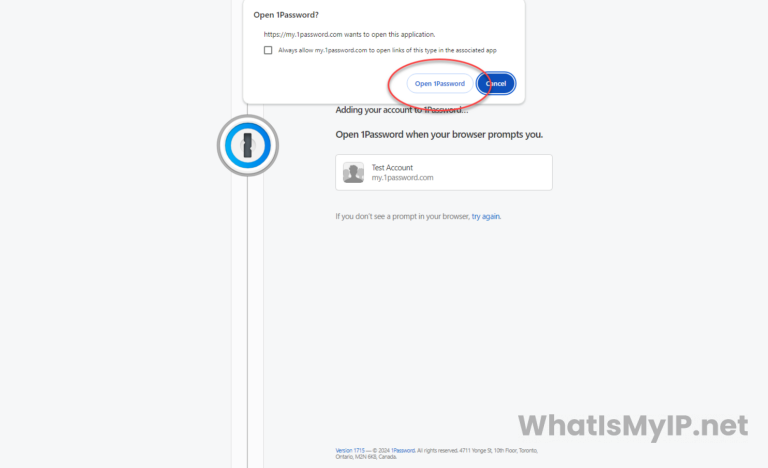
4.1.1. Choose your main account by selecting it from the list. You will get a popup asking you if you would like to allow the website to open the app “1Password”. Click the button that says “Open 1Password” and the setup will go back to the 1Password installation and open the app to your account and you are done with the Windows Installation of 1Password.

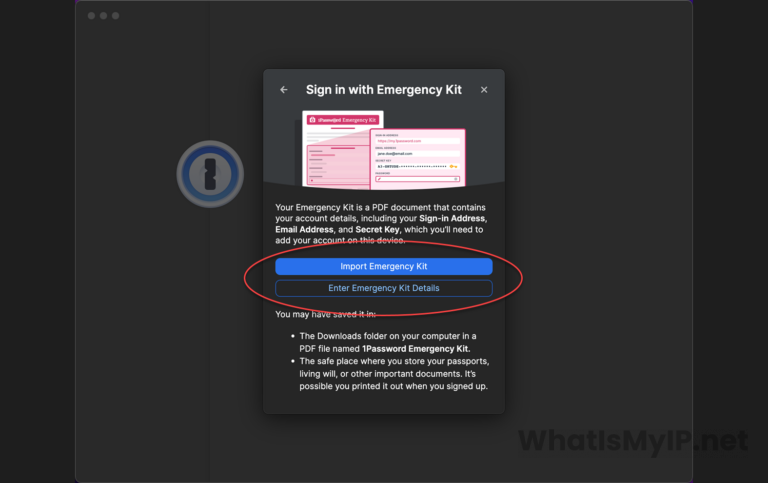
4.2. Sign in with Emergency Kit / Account Details: These next 2 options are pretty much the same which will involve typing in your login account information.
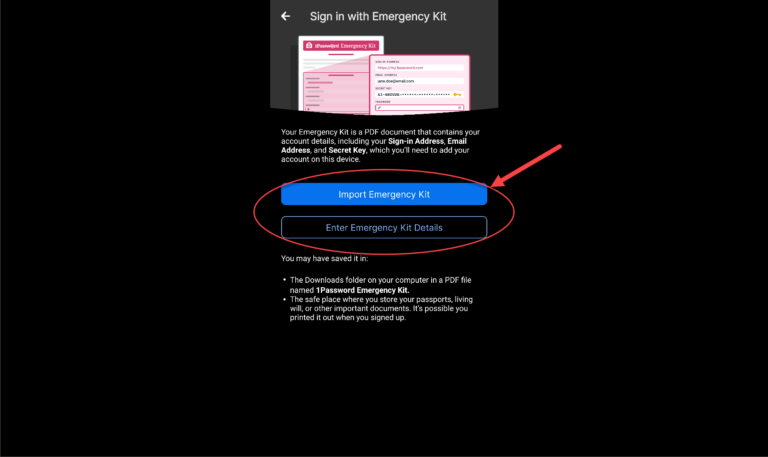
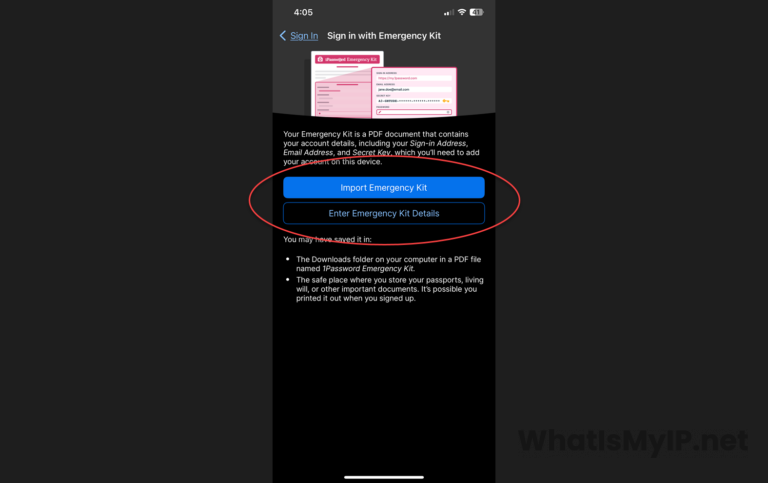
4.2.1. Sign in with Emergency Kit: By selecting this option, you will get a popup with 2 options, Import Emergency Kit or Enter Emergency Kit Details. If you select the Import option, a box will popup asking you to location the PDF File called the “Emergency Kit” you had downloaded in the signup process and upload that file to the sign in process. You will still need to type in you password once the kit has been uploaded.
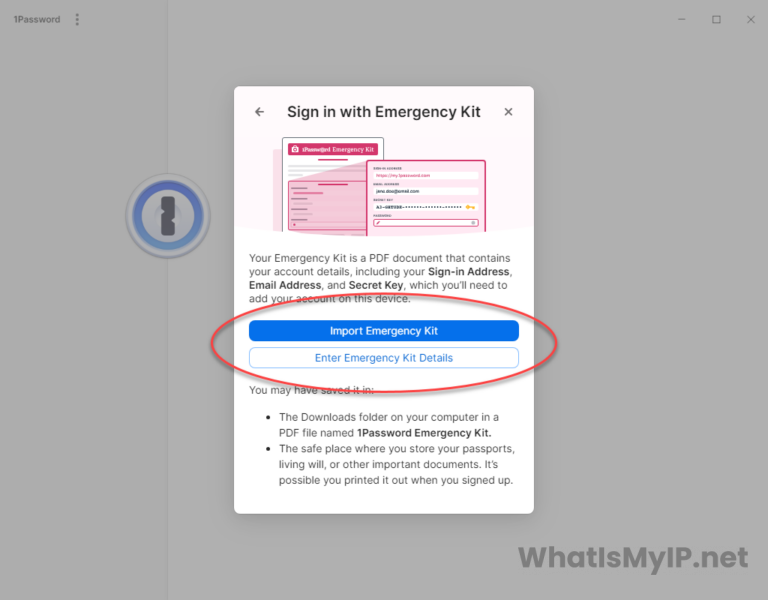
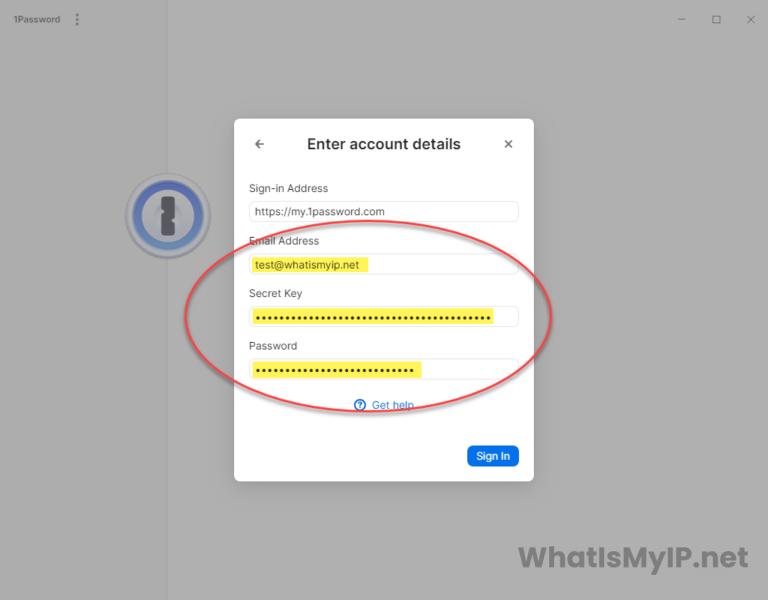
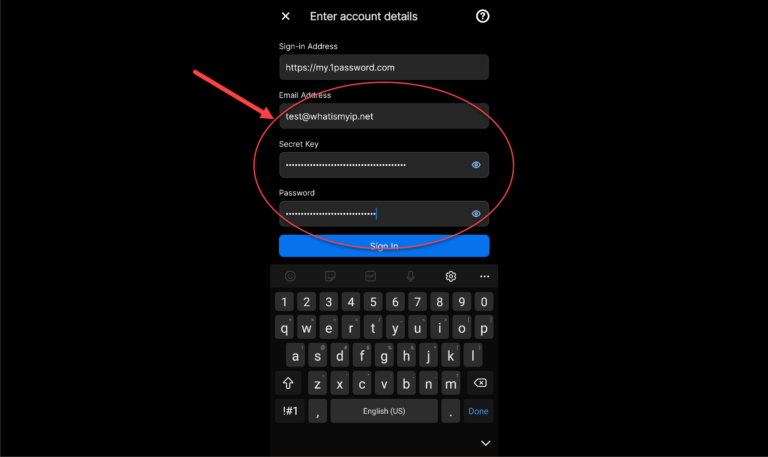
4.2.2. Enter Emergency Kit Details: By selecting this option fi you don’t have the PDF file handy, you will be prompted to enter you account details. You will be asked for your Email Address, Secret Key, and Password. Once you fill those in, you will be signed into the app.
1. Download the MacOS App: Visit the 1Password downloads page and select the “1Password for Mac” link. Click the link and download the latest zip file with the installer onto your Mac.
2. Install 1Password on your Mac: Once you have the saved zip file, go ahead and open it by double clicking on it and it will open in Finder. You will see the 1Password Installer file, double click on that file and the installer with start.
Once the installer has finished, the 1Password program will start and you will get the Welcome screen where you will then click the “Sign In” button to continue with the setup.
3. Sign In to Account: You will be asked how do you want to sign in to your 1Password account. There will be a few choices on how to sign in to your account. We will walk through 3 of them step-by step.
3.1. Sign in on 1Password.com: Once you click this, your browser will open to the 1Password.com website and redirect you to the login page for your account. It will prompt you to select an account already associated on your browser since you signed up on this computer. You will be prompted to allow 1Password.com to open the 1Password app, click “Open 1Password” and if you are not logged in, it will prompt you for your master password. Once you enter your password you will be logged in.
3.2. Sign in with Emergency Kit: If you choose this option, you can either select the “Import Emergency Kit” option or the “Enter Emergency Kit Details” option. If you select the import option, it will open up a select file box where you will need to find the PDF file you had downloaded at signup. If you select the “Enter Details” option you will get a box where you will need to input the same details that are on your Emergency Kit PDF file. It will be the same option as the next one right after this option.
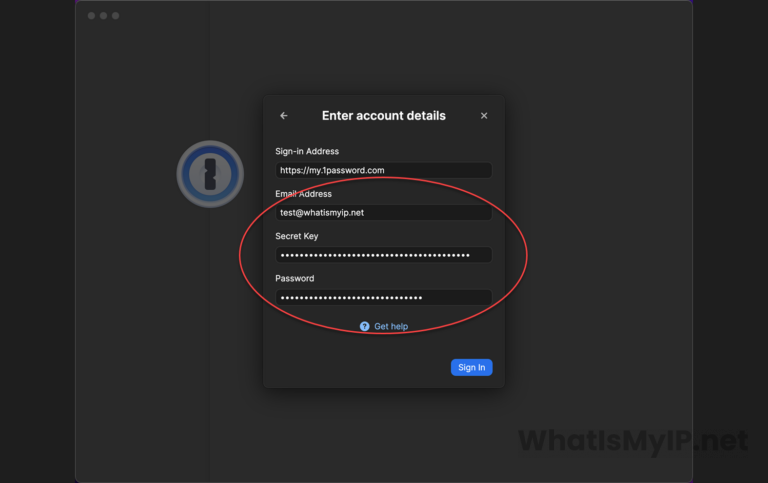
3.3. Enter account details: If you select this option or had selected this option in the Emergency Kit section, you will get a box that you need to input all your private details about your account. It will ask for your Email Address, Secret Key, and Password.
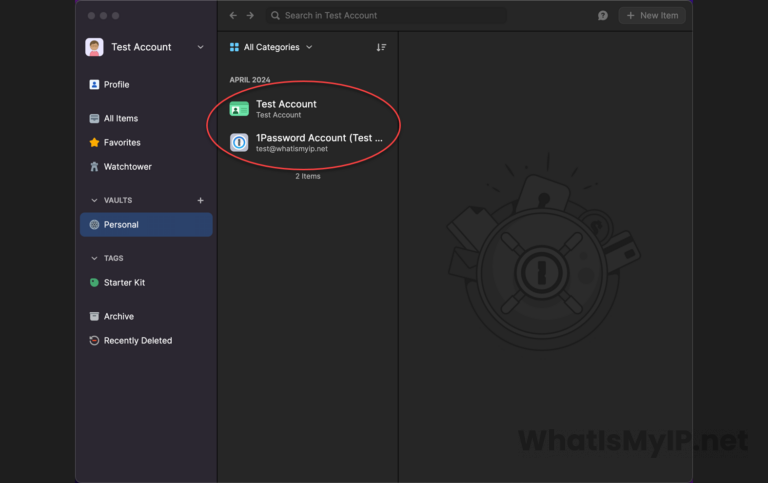
4. Sign In Complete: Once you sign in the program will open and you will see all your information from anything you already have in there.
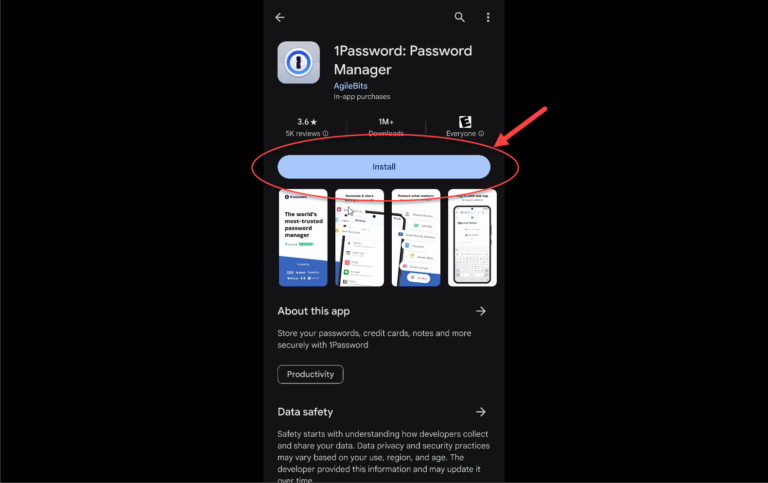
1. Down the Android App from Google Play Store: Open the Google Play Store on your Android device and search for “1Password.” Tap on the “Install” button to download and install the app. You can also just click here to go directly to the app.
2. Welcome to 1Password: Once the app the installed on your android device, go ahead and run the app. You will be see the welcome screen with 2 choices, one for “Create New Account” and the other “Sign In”. Click on the “Sign In” button to get started.
3. Sign In to 1Password: On the sign in screen you will see multiple options to sign in. We will walk you through some of the options on how to sign in step-by-step. We will go through the simpler ones as they will be the easiest to setup and get running with 1Password on your Android device.
3.1. Sign in with Emergency Kit: You can choose to sign in using the emergency kit you had downloaded on setup. Once you click this button you will be given a screen with 2 more choices on it, either “Import Emergency Kit” or “Enter Emergency Kit Details”. If you have access to the download PDF file, you can select the Import options and find the downloaded file and import your credentials this way. If you do not have access to the digital file but have a hard copy, you can select the “Enter Emergency Kit Details” option.
3.1.1. Enter Emergency Kit Details: If you select this option, you will have a screen where you will need to fill in the account details that are on the emergency kit pdf that you downloaded.
3.2. Sign in on 1Password.com: If you select this option, you will be redirected to the 1Password.com website which you will see some options on how to finish your sign in through the website portal. This option is kind of tricky since it’s it requires you to have already be sign in either on a desktop computer or another mobile device.
3.3. Enter account details: This option is by far the easiest and fastest way to sign in and setup your 1Password app on your Android device. When selected, it will prompt you to enter your account details just like the Emergency Kit does. Just enter your information and your in.
4. Signed In: One you are signed in to your 1Password account on your Android device, you will get the main screen and see your main account details.
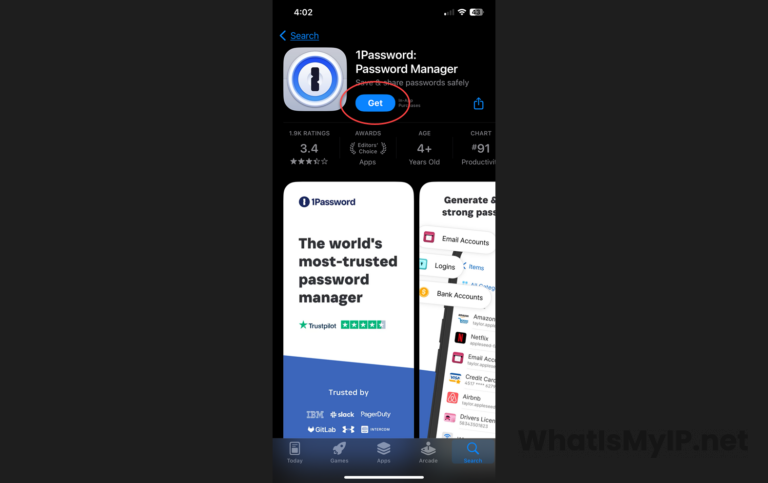
1. Download the App from the Apple App Store: First open up the Apple App Store on your device and search for 1Password or click here to go directly to the download page. From there you will see a Get button to download and install the app. Click the Get button and wait for the app to install.
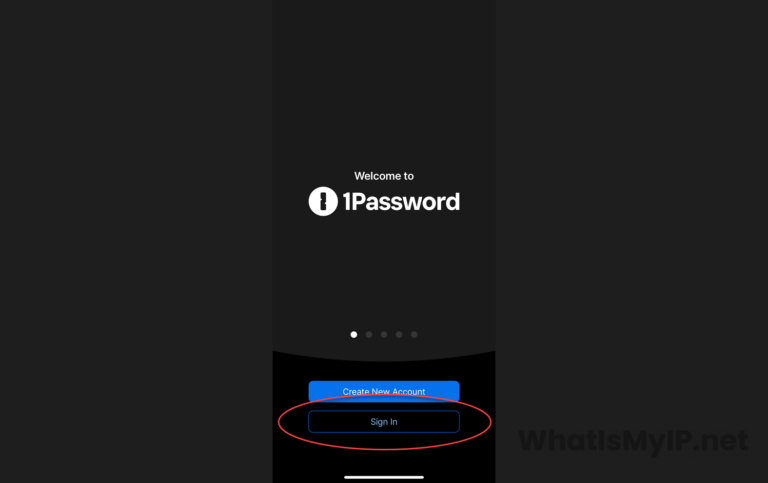
2. Welcome to 1Password: Once the app the installed on your ios device whether on a iPhone or iPad, go ahead and run the app. You will be see the welcome screen with 2 choices, one for “Create New Account” and the other “Sign In”. Click on the “Sign In” button to get started since we have already created an account.
3. Sign In to 1Password: On the sign in screen, just like on android you will see multiple options for signing in. We will walk you through some of the options on how to sign in step-by-step. We will go through the simpler ones as they will be the easiest to setup and get running with 1Password on your iOS (iPhone / iPad) device.
3.1. Sign in with Emergency Kit: You have the option to sign in using the emergency kit you downloaded during setup. Upon clicking this button, you’ll encounter two additional choices: “Import Emergency Kit” or “Enter Emergency Kit Details”. If you possess the downloaded PDF file, you can opt for the Import feature, locate the file, and import your credentials accordingly. Alternatively, if you don’t have digital access but possess a hard copy, you can choose the “Enter Emergency Kit Details” option.
3.1.1. Enter Emergency Kit Details: Choosing this option will lead you to a screen where you’ll be prompted to input the account details from the emergency kit PDF you downloaded.

3.2. Sign in on 1Password.com: Opting for this choice will redirect you to the 1Password.com website, where you’ll encounter various options to complete your sign-in process through the website portal. This option can be a bit tricky as it necessitates that you’re already signed in on either a desktop computer or another mobile device.
3.3. Enter account details: By far the simplest and quickest method to sign in and set up your 1Password app on your iOS (iPhone / iPad) device is through this option. Upon selection, it will prompt you to input your account details, similar to the Emergency Kit. Simply enter your information, and you’re all set.
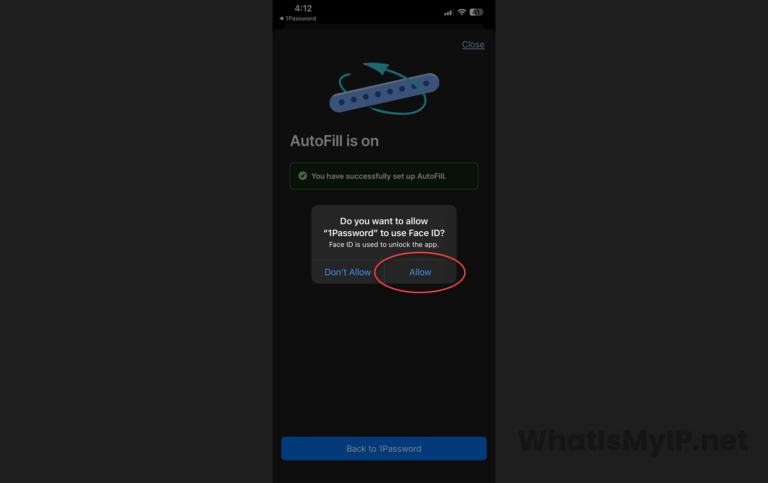
4. Finalize Sign In Options: Once you are logged into your account, you will be asked if you would like to activate “Face ID” login to easily unlock your 1Password account so you don’t have to input your master password all the time. Just click the slider to activate this option and hit Continue at the bottom.
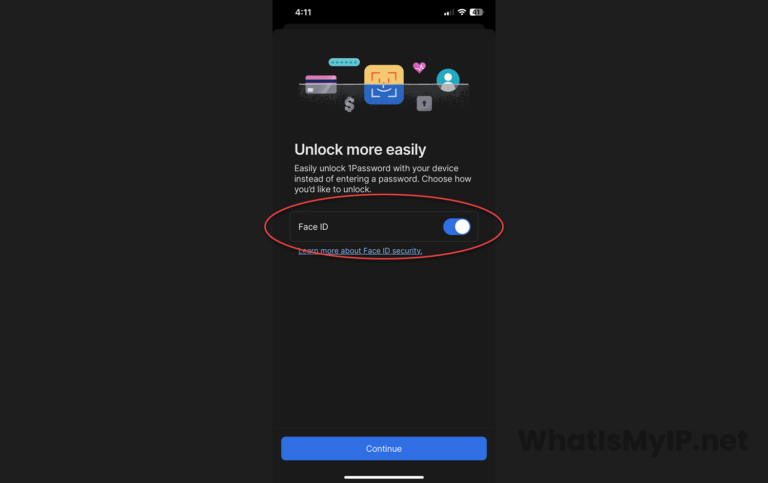
4.1. Turn on Face ID: You will get a popup notification from iOS for allowing 1Password to use your Face ID to login, click the “Allow” option to set it up.
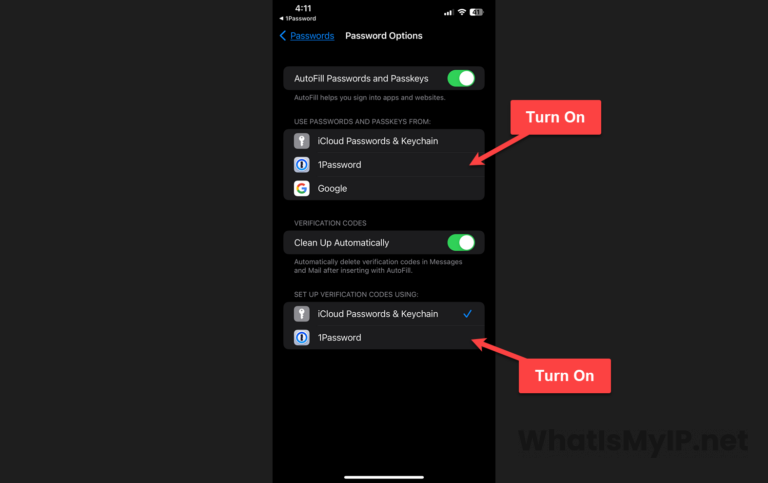
5. AutoFill on iOS: This next screen will ask you to turn on AutoFill on your iOS device so 1Password can autofill your username’s and password’s on websites and apps. You will need to go into your settings page for the AutoFill and select “1Password” from the list. You can click the “Go to AutoFill Settings” on this page which will take you straight to that section, otherwise it is in Settings>Passwords>Password Options.
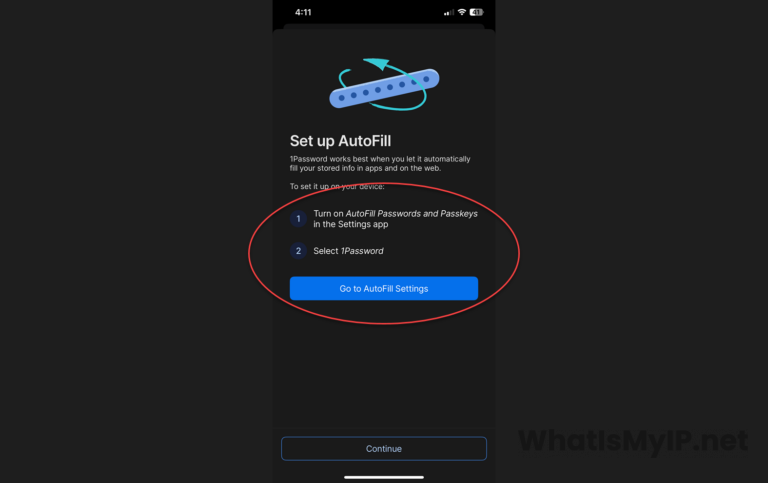
5.1. Select AutoFIll Option: Once you are on the settings page for the AutoFill, there is 2 sections where you will need to select 1Password as the service to use. The first section is for using Passwords & Passkeys from: select “1Password”. The second section is for Set up Verification Codes using: select “1Password” here as well, then once those 2 are selected for 1Password click to go back to 1Password Setup at the top left corner.
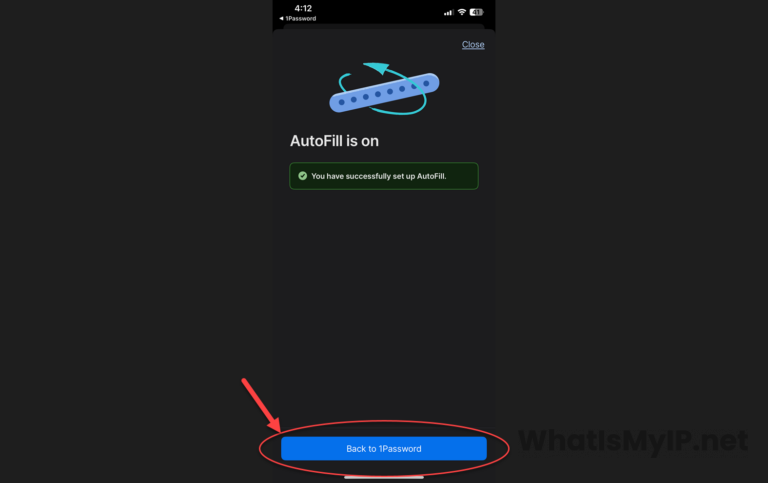
Once you go back to 1Password setup, you will get a confirmation in green that the AutoFIll has been setup. You can click the button “Back to 1Password” on the bottom to continue.
Signed In: Once you’ve successfully signed in to your 1Password account on your iOS (iPhone / iPad) device, you’ll be directed to the main screen where you can view your primary account details.
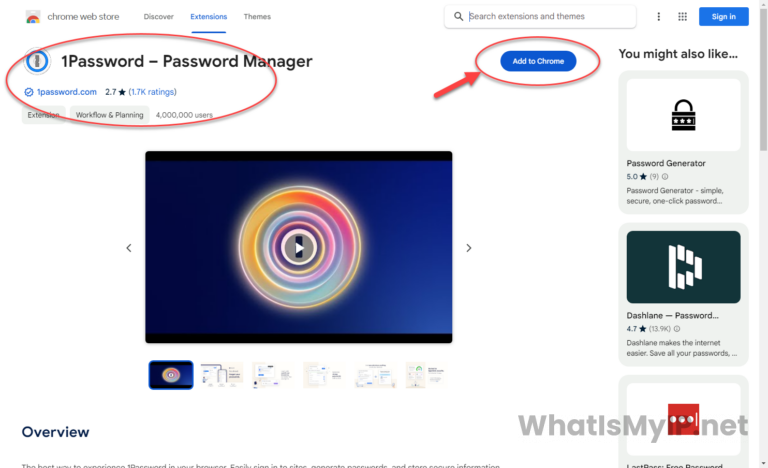
1. Visit Chrome Web Store: Open Google Chrome and go to the 1Password Extension Page. You will see a button at the top right “Add to Chrome”, click it to add to your Chrome browser.
2. Add Extension: Once to click the add button, you will get a popup box telling you what the 1Password extension can do and also asking for permission to “Add Extension”. Click the “Add Extension” button on the bottom of the popup to begin the installation.

3. Welcome to 1Password Setup Google Chrome: Once the installation is complete, the setup will continue with a Welcome screen and add your account to it. It’s easier if you already have the desktop version it will use the login credentials from that, otherwise you will be taken to the 1Password website to login and add your account to it.
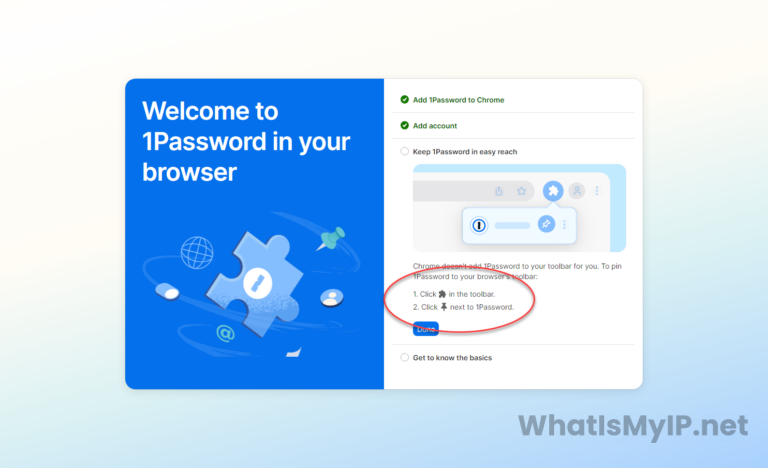
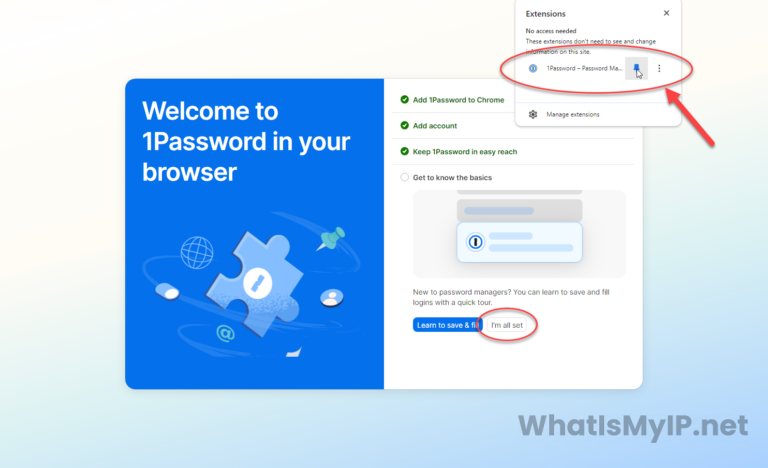
4. Pin Extension: On this next step the extension will ask you to pin the icon to the toolbar for easy access. On Chrome, just click the Puzzle Piece icon on the upper right hand corner and next to the 1Password extension name, click the Pin icon so it turns blue and you are all set. Then click the “I’m all set” button to finish this process.
5. Import Passwords from Chrome: On this next screen is where you will be able to import passwords stored in your chrome browser or from another password manager. If you have nothing to import, then just click the “I’m all set” at the bottom to continue.

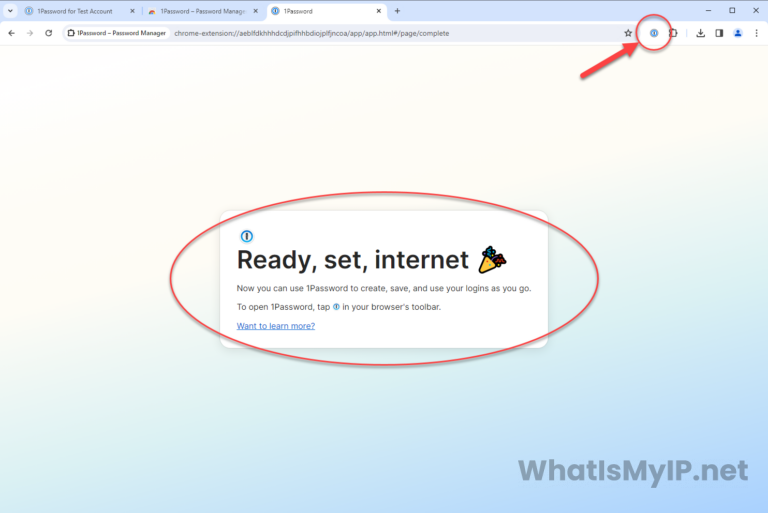
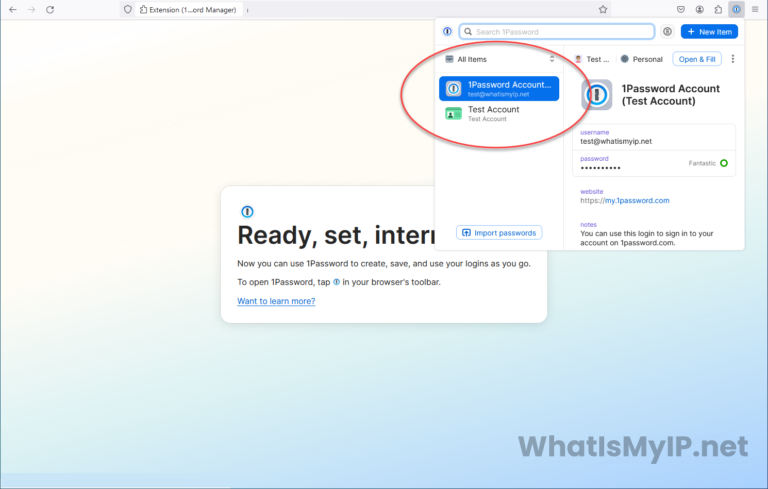
6. All Complete: Once you see the “Read, set, internet” then that means you are all done with the setup of 1Password extension for Google Chrome. You can now click on the 1Password icon on the upper right and it will open the 1Password app which you should also see your account.
1. Visit Firefox Add-Ons: Open up your Firefox browser and go to the 1Password Extension Page. You will see a button at the top “Add to Firefox”, click it to add 1Password to your Firefox browser.
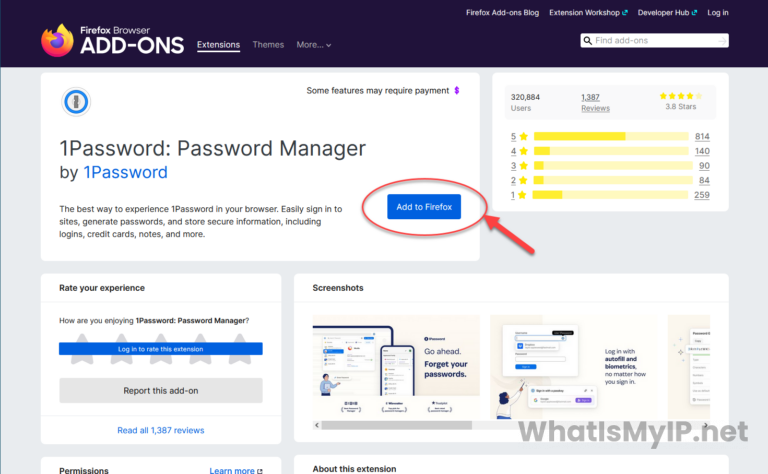
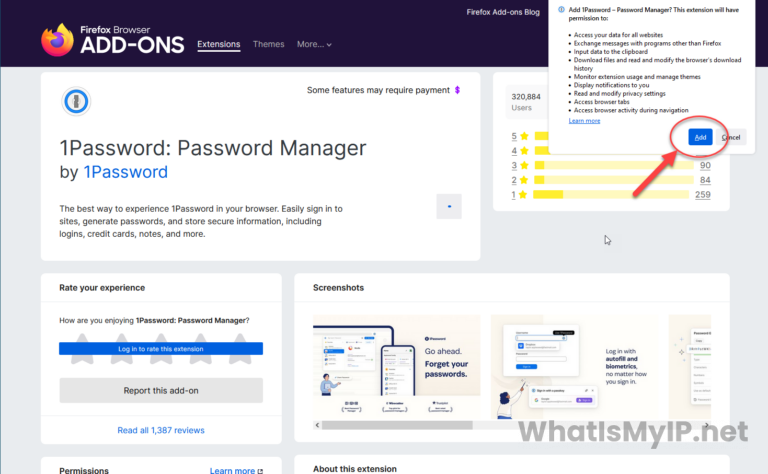
2. Add Extension: Once to click the add button, you will get a popup box telling you what the 1Password add-on extension can do and also asking for permission to “Add Extension”. Click the “Add” button on the bottom of the popup to begin the installation.
3. Welcome to 1Password Setup for Firefox: Once the installation is complete, the setup will continue with a Welcome screen and add your account to it. It’s easier if you already have the desktop version it will use the login credentials from that, otherwise you will be taken to the 1Password website to login and add your account to it.
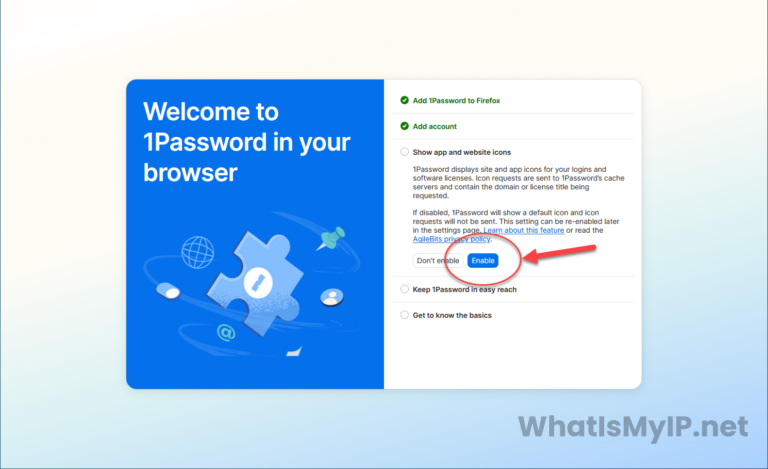
4. Enable Icons: On this next step the extension will ask you to enable the ability to display icons for logins to the specific domains and software licenses. If you want, you can click the “Enable” button to do so, otherwise click the “Don’t enable” button to continue.
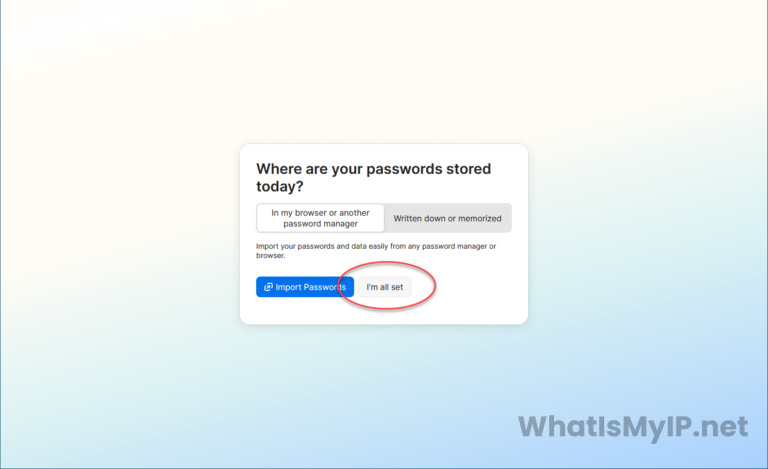
5. Import Passwords from Firefox: On this next screen is where you will be able to import passwords stored in your Firefox browser or from another password manager. If you have nothing to import, then just click the “I’m all set” at the bottom to continue.
6. All Complete: Once you see the “Read, set, internet” then that means you are all done with the setup of 1Password add-on extension for Firefox. You can now click on the 1Password icon on the upper right and it will open the 1Password app which you should also see your account.
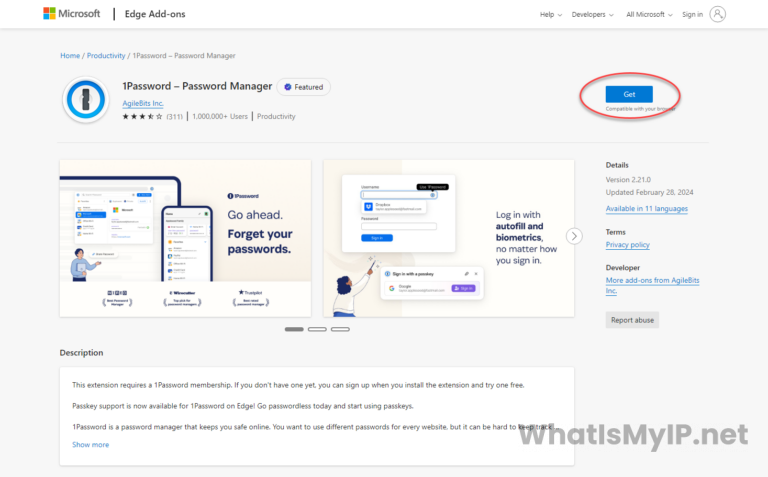
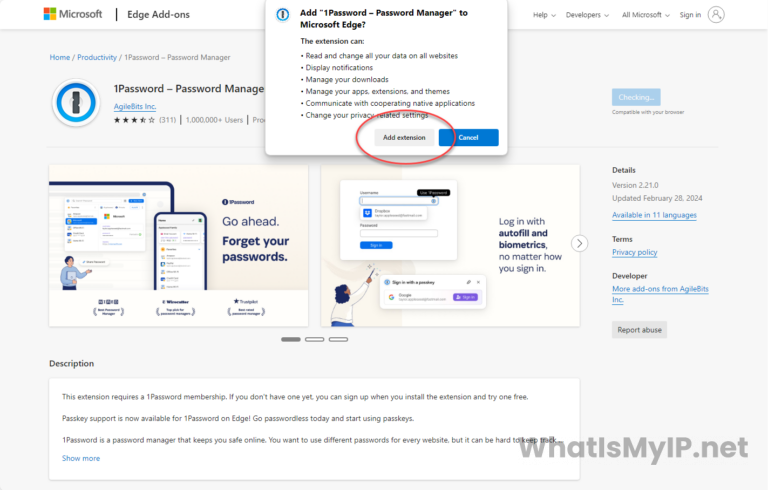
1. Visit Microsoft Edge Add-Ons: Open up your Microsoft Edge browser and go to the 1Password Extension Page. You will see a button at the top right “Get”, click it to add 1Password to your Microsoft Edge browser.
2. Add Extension: Once to click the add button, you will get a popup box telling you what the 1Password add-on extension can do and also asking for permission to “Add Extension”. Click the “Add Extension” button on the bottom of the popup to begin the installation.
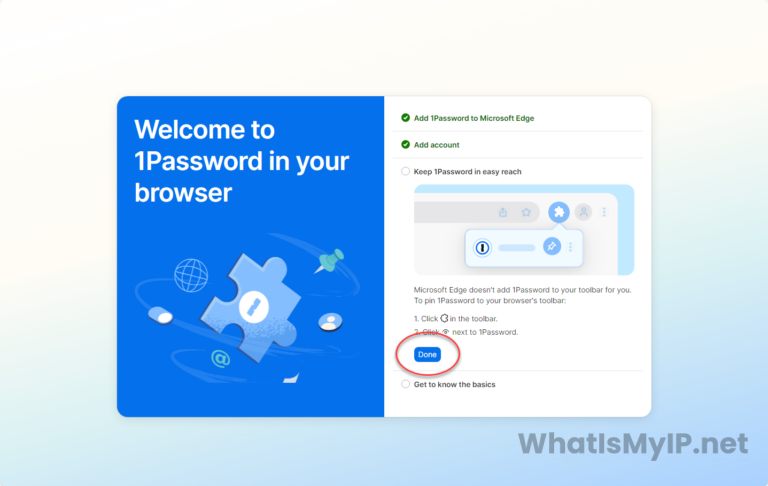
3. Welcome to 1Password Setup for Microsoft Edge: Once the installation is complete, the setup will continue with a Welcome screen and add your account to it. It’s easier if you already have the desktop version it will use the login credentials from that, otherwise you will be taken to the 1Password website to login and add your account to it.
4. Pin Extension: On this next step the extension will ask you to pin the icon to the toolbar for easy access. On Edge, just click the Puzzle Piece icon on the upper right hand corner and next to the 1Password extension name, click the Pin icon so it turns blue and you are all set. Then click the “Done” button to finish this process.
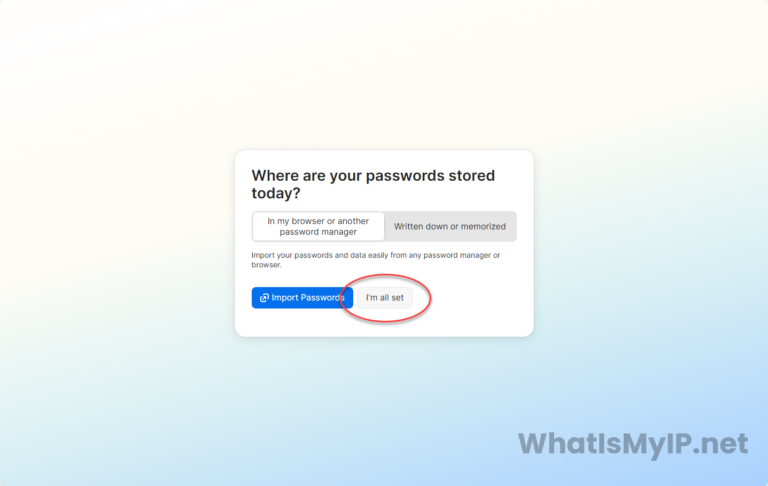
5. Import Passwords from Edge: On this next screen is where you will be able to import passwords stored in your Microsoft Edge browser or from another password manager. If you have nothing to import, then just click the “I’m all set” at the bottom to continue.
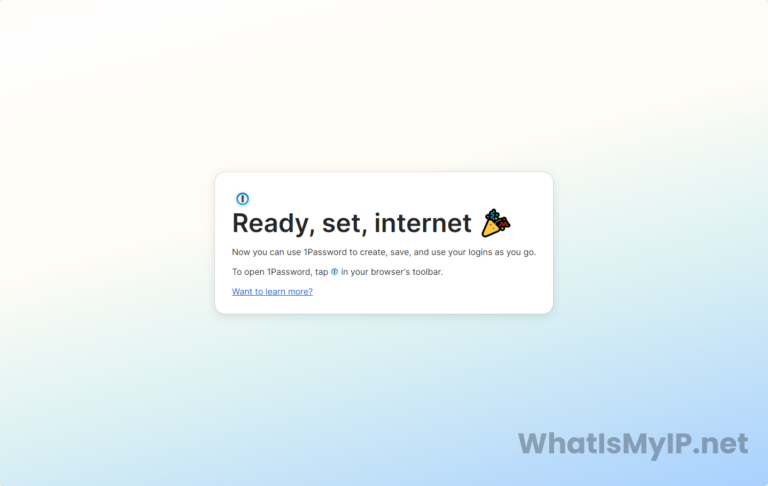
6. All Complete: Once you see the “Read, set, internet” then that means you are all done with the setup of 1Password add-on extension for Microsoft Edge. You can now click on the 1Password icon on the upper right and it will open the 1Password app which you should also see your account.
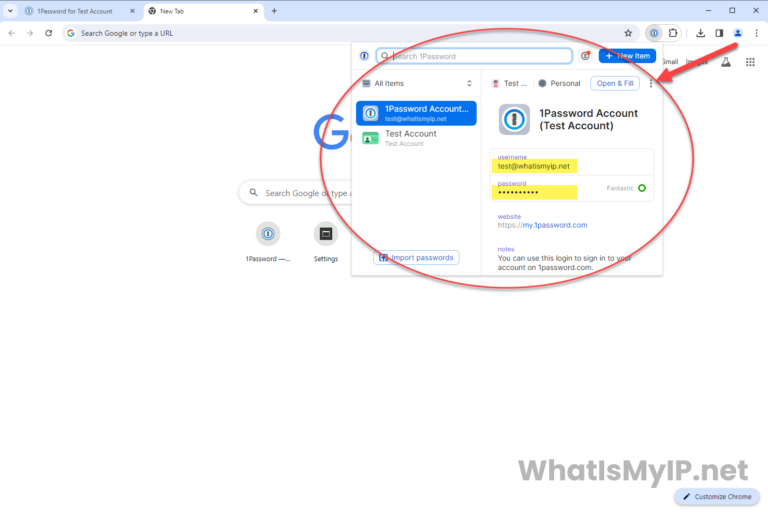
Once you’ve installed the browser extensions, you can easily access your saved passwords and use features like autofill directly from your browser. Simply click on the 1Password icon in your browser’s toolbar, log in with your master password if prompted, and access your passwords and other items stored in 1Password.
With these extensions, you can seamlessly integrate 1Password into your browsing experience across different platforms and browsers, ensuring secure password management wherever you go.
It is crucial to have strong cybersecurity measures in place in this digital era since our lives are so interconnected with the internet. Among these methods, using a password manager is particularly important since it serves as a foundation for protecting our online identities and private data. Using a password manager is becoming more than just a smart idea; it’s a necessary need for both people and enterprises in this world of ever changing cybersecurity threats.
The most basic function of a password manager is to act as a safe haven for all of our passwords. Reusing passwords or using weak, readily guessable ones is a common problem in this age of several internet accounts managed by the typical individual. Unfortunately, this behavior puts us at serious danger since hackers might get access to several accounts with only one leaked password. This could result in severe repercussions including identity theft and financial loss. We can create strong, unique passwords for each account and have peace of mind knowing that they are encrypted and secured by many levels of protection when we use a trustworthy password manager.
Also, password managers are really helpful because of how easy and efficient they are. Password management solutions that are both secure and easy to remember are here to stay. Gone are the days of writing passwords down or keeping them in unsafe digital files. When we have a password manager, we may use a master password or biometric authentication to access all of our passwords on any device, at any time. We can autofill credentials with simplicity and efficiency thanks to password managers that work seamlessly with online browsers and mobile applications. This further simplifies the login procedure.
These days, password managers aren’t only for managing passwords; many of them include a ton of other features that may help us be more secure online. Using a password manager gives us back control of our digital life by securely storing important information like credit card numbers and personal notes, and it also provides sophisticated options for securely exchanging passwords with trusted persons or team members.
Essentially, by choosing to use a password manager, we are taking a proactive approach to strengthening our digital defenses and reducing the dangers linked to online security threats. Safeguarding our personal and financial information and helping to build a more secure online environment for future generations are both achieved via the use of a trustworthy password manager and the practice of good password hygiene. As we begin this path towards a safer digital future, let us not forget that a robust password—along with a trustworthy password manager—is the first line of protection.